Get IDN (International Domain Name ) Email Address For Your Business
Looking for an IDN Email Address Provider for your
Business?
Get IDN (International Domain Name ) Email Address For Your Business at a very reasonable price.Here are the steps to get email hosting for your business
Step 1
Visit XgenPlus website and click on "Buy" option from the menu.
 |
| Screenshot 1 |
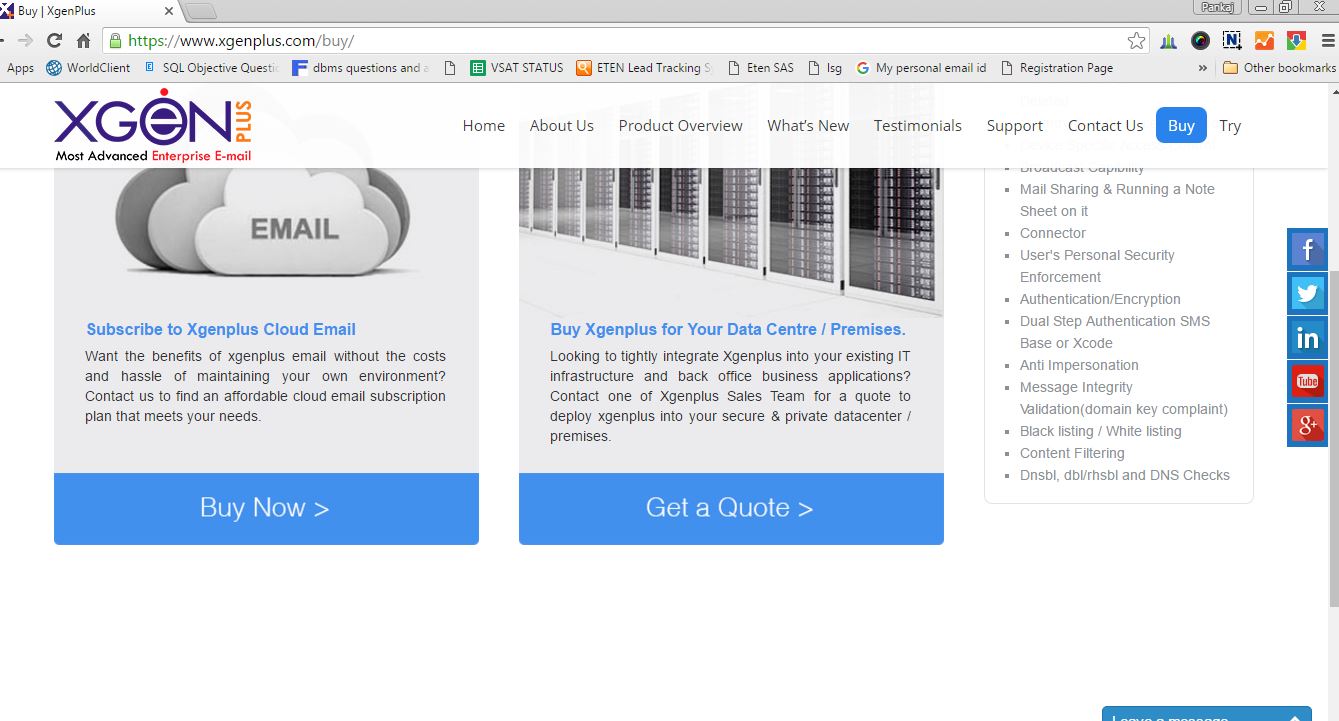
Step 2
This will bring you to a page showing "XgenPlus Cloud Email Hosting" & "XgenPlus For Your Data Center & Premises"
 |
| Screenshot 2 |
Click on 'Buy Now" in case you are looking for Cloud Email Service and in case you are looking to integrate Xgenplus into your existing IT-Infrastructure (On Premises) then you can ask for the quote from our sales team by clicking on the option "Get A Quote". Our sales team will guide you regarding prices, offers, benefits you will get by integrating our email solution in your organization.
Step 3
Select your desired plan and click on "Buy Now". In general basic and premium are popular among small business and advance plan is preferred by large enterprises.
 |
| Screenshot 3 |
Step 4
After selecting your plan, you will be asked to choose no of users and for how long you need email hosting for your business.
Set the quantity of email id's you want with the available + and - option and click on "Buy Now"
 |
| Screenshot 4 |
Step 5
If you are already an existing user then complete the details with your existing email Id and password , else click on the option "New User" & fill the details and click on save as shown in the screenshot 7
 |
| Screenshot 6 |
 |
| Screenshot 7 |
Step 6
The moment you click on Save Option you will get order summary, a kind of invoice as shown
below. Now click on the option "Make Payment" option. You will get a payment gateway screen.
below. Now click on the option "Make Payment" option. You will get a payment gateway screen.

Step 7
Fill your payment details and click on "proceed to secure payment gateway"


Step 8
Your subscription has been confirmed. Now confirm your order number from your registered mail id.


Step 9
To confirm your email id you have to click on "click here" and you will be redirected directly to the page domain order details.

Step 10
The below screenshot shows that your order has been confirmed. Now, fill your last name and order id. (Note: For order ID check the screenshot above) and press submit.

Step 11
After you press the submit button, the screen will appear as Domain Registration consisting of 3 steps -
In step 1 . You have to fill your domain name in your preferred language rest all details will appear automatically than click on Next

Step 11
In step 2. Mention your admin email id. You can take any admin email id like पंकज@जनजन.भारत and click on submit.

Step 12
In step 3. Check all the details and send the screenshot of this step3 screen to aanchal@xgenplus.com for the verification of your domain. After your Domain is verified by our Xgenplus team , the user will be notified through mail and after that you can click on verify option.

Step 13
With the message 'Verified Successfully' you will receive an OTP which will be your ONE-time password for your email account.

Step 14
Congratulation, You are now the owner of your domain and email address in your native language. Now you can login with your email id and the OTP you have received on your registered mobile number.


Step 15
XgenPlus is providing you with two email ids. One for the admin and another one is for the user that means at the cost of one email id you have a power to use two email ids.

Hope, You have learned how to get Email id. In your native language. You can also take 30 Days Free Trial Of XgenPlus IDN Email
Also Read : Benefits of business email hosting
Also Read : Benefits of business email hosting
For further query you can mail us on – support@xgenplus.com


Post a Comment